Tic-Tac-Toe示例应用概览
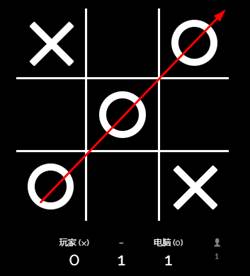
在我们将要创造的游戏中,玩家将选择谁拿X,谁拿O。然后,他们将轮流在3×3格中标记空间,每圈一个标记。如图所示,在水平、垂直或对角线上成功放置三个标记的玩家获胜.
在上图中,拥有Os的玩家将赢得游戏,因为从左上角到右下角,对角线上有三个O字。玩家必须输入他们的电子邮件和姓名进行注册,然后才能开始游戏。每一场比赛后,他们都会收到一个比赛分数,这个分数会被加到他们的总分中。我们将有一个排行榜,旨在提供球员排名和最高分数的信息,为一系列的游戏。在创建游戏时,玩家必须向其他玩家发送邀请,然后显示一个特定的等待页面,直到其他玩家做出响应。收到邀请邮件后,其他玩家可以确认请求并加入游戏。当两个玩家在线时,游戏开始。这是一个预览,我们将建立我们的演示应用程序周围,但谈话是便宜的。让我们从下一节开始构建它。
搭建TTT游戏
在实现用户注册特性之前,我们必须理解它并决定一切应该如何工作。我们必须定义用户故事和工作流。为此,我们需要在预览部分更详细地分析前面提到的井字游戏描述。
l
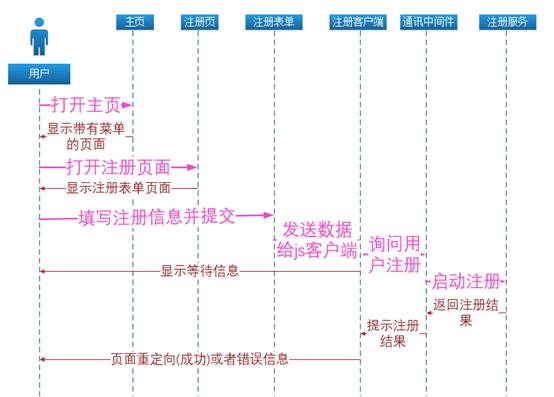
将会有一个带有用户注册链接的主页,新用户必须点击注册才能创建他们的玩家帐号。单击用户注册链接将用户重定向到专用注册页面。
l
注册页面将包含一个注册表单,用户必须在其中输入自己的个人信息,然后进行确认。
l
JavaScript客户机将验证表单、提交并将数据发送到通信中间件,然后等待结果。
l
通信中间件将接收请求并将其路由到注册服务。
l
注册服务将接收请求,验证数据的完整性,检查电子邮件是否已用于注册,并注册用户或返回错误消息。
l
通信中间件将接收结果并将其路由到等待的JavaScript客户机。
l
如果结果成功,JavaScript客户机将重定向用户开始玩游戏,如果结果失败,它将显示一条错误消息。
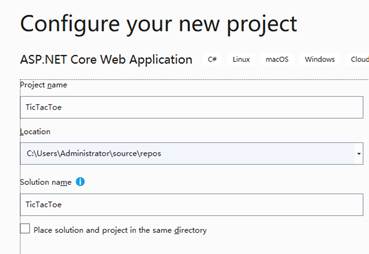
步骤1.创建ANC3 Web Application
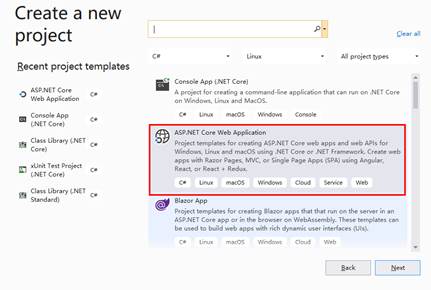
步骤2.填写项目名称 Tic-Tac-Toe
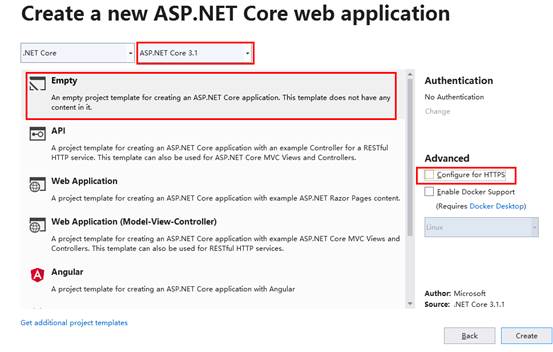
步骤3 选择模版并配置环境
ANC3默认类简介
每一个ANC3项目无论您要构建的模板是MVC还是空模板,总会有最少的类管道用于确保您有一个工作的应用程序。一个ASP。NET
Core 3应用程序要能够启动,有两个很重要的主要类:Program类和Startup类;下一节将解释这两种方法。
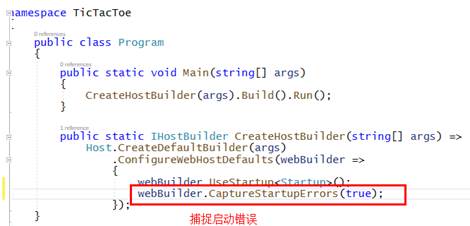
Program类
Program类是ASP的主要入口点。与其他NET Framework控制台应用程序非常相似。两者都有一个在运行应用程序时执行的Main()。ANC3执行的对象为IHostBuilder,通过独立的CreateHostBuilder函数配置Host主机环境.
|
public class Program
{
public static
void Main(string[]
args)
{
CreateHostBuilder(args).Build().Run();
}
public static
IHostBuilder CreateHostBuilder(string[] args) =>
Host.CreateDefaultBuilder(args)
.ConfigureWebHostDefaults(webBuilder =>
{
webBuilder.UseStartup<Startup>();
//所需其他配置写在下面
});
}
|
而在ANC2.x版本中使用在main函数内部声明WebHostBuilder后直接配置并运行
|
public static void Main(string[] args)
{
var host = new WebHostBuilder()
.UseKestrel()
.UseStartup<Startup>()
.Build();
host.Run();
}
|
Startup类
另一个自动生成的元素,它存在于所有类型的ASP.NET Core 3项目,是Startup类。如前所述,程序类主要处理与托管环境相关的所有内容。Startup类是关于服务和中间件的预加载和配置的。这两个类是所有ASP.NET Core 3的基础应用程序。
方法1: public void
ConfigureServices(IServiceCollection services)由运行时调用并用于向容器添加服务
方法2: public void Configure用来配置HTTP管线.
准备项目基础结构
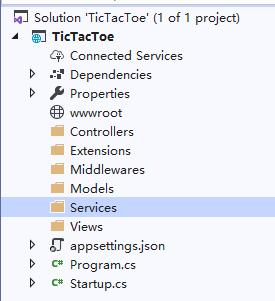
根据项目需要在根目录下构建以下文件夹:wwwroot(存放静态文件),Models(模型),Views(视图),Contollers(控制器),Services(服务),Middlewares(中间件),Extensions(扩展).
步骤4.在根目录下新建所需的文件夹
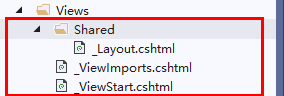
步骤5.创建View视图下所需的必要辅助文件共享文件夹Shared,视图起始引导和空间导入声明.
为了使用TagHelpers在导入声明文件中进行更改其他暂不变
|
@addTagHelper *,Microsoft.AspNetCore.Mvc.TagHelpers
|
创建主控制器和主页
步骤6.在Controllers文件夹上右键弹出Add=> Controller,创建一个新的控制器类.名字问HomeController.

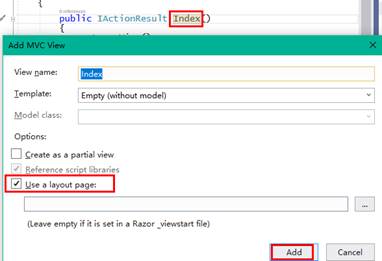
步骤7.在Index方法上右键Add View,填写如下参数后,点击Add.
使用服务端包和布局美化显示
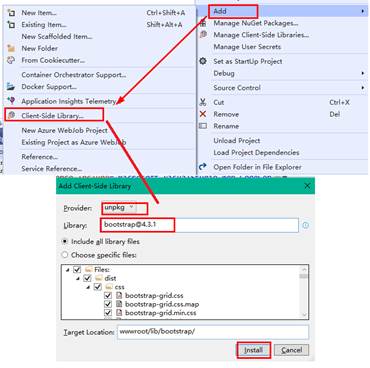
使用node package
manager(NPM)工具或者Client-Side
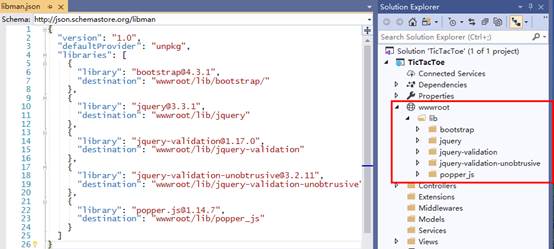
Library(客户端库工具CSL),下载下表所需的外部开发工具:
|
工具名
|
版本号
|
|
bootstrap
|
4.3.1
|
|
jquery
|
3.3.1
|
|
jquery-validation
|
1.17.0
|
|
jquery-validation-unobtrusive
|
3.2.11
|
|
popper.js
|
1.14.7
|
步骤8.右键Add->Client-side Libraryt填写所需的库名称@版本号 按照默认目录安装即可.
步骤9.在wwwroot目录下创建自定义的css和js脚本库.新建css和js两个空文件夹,分别添加site.css和site.js两个文件.并预定义site.css风格
|
/*内容风格部分*/
/*标签选择器*/
body {
padding-top: 50px;
padding-bottom:
20px;
}
/*类选择器*/
.body-content
{
padding-left: 15px;
padding-right: 15px;
}
/*多重选择器*/
input,
select,
textarea {
max-width: 280px;
}
/*=================[验证风格]========================*/
.filed-validation-error {
color: #b94a48;
}
.field-validation-valid {
display: none;
}
input.input-validation-error {
border: 1px
solid #b94a48;
}
input[type=checkbox].input-validation-error {
border: 0 none;
}
.validation-summary-errors {
color: #b94a48;
}
.validation-summary-valid {
display: none;
}
|
完成布局页
布局页面采取垂直三段式布局,带有菜单的导航栏,主体渲染内容(变量)和页脚内容.隐式内容包括Head部分的定义,CSS环境的配置(可简化),JS环境的配置(可简化).
步骤10.完善Head的相关定义

步骤11.定义CSS的部署配置
|
@*CSS环境定义*@
@*开发版*@
<environment
include="Development">
<link href="~/lib/bootstrap/dist/css/bootstrap.min.css"
rel="stylesheet"
/>
</environment>
@*部署版*@
<environment
exclude="Development">
<link href="https://stackpath.bootstrapcdn.com/bootstrap/4.3.1/css/bootstrap.min.css"
rel="stylesheet"
asp-fallback-href="~/lib/bootstrap/dist/css/bootstrap.min.css"
asp-fallback-test-class="sr-only"
asp-fallback-test-property="postion"
asp-fallback-test-value="absolute"
crossorigin="anonymous"
integrity="sha384-ggOyR0iXCbMQv3Xipma34MD+dH/1fQ784/j6cY/iJTQUOhcWr7x9JvoRxT2MZw1T"
/>
</environment>
<link href="~/css/site.css"
rel="stylesheet"
/>
|
步骤12.利用bootstarp定义导航栏
|
@*导航栏*@
<header>
<nav class="navbar
navbar-expand-sm navbar-toggleable-sm navbar-light bg-white border-bottom
box-shadow mb-3">
<div class="container">
<a class="navbar-brand"
asp-area=""
asp-controller="Home" asp-action="Index">TicTacToe</a>
<button class="navbar-toggler"
type="button"
data-toggle="collapse"
data-target=".navbar-collapse"
aria-controls="navbarSupportedContent"
aria-expanded="false"
aria-label="Toggle
navigation">
<span class="navbar-toggler-icon"></span>
</button>
<div class="navbar-collapse
collapse d-sm-inline-flex flex-sm-row-reverse">
<ul class="navbar-nav
flex-grow-1">
<li class="nav-item">
<a class="nav-link
text-dark" asp-area="" asp-controller="Home" asp-action="Index">Home</a>
</li>
<li class="nav-item">
<a class="nav-link
text-dark" asp-area="" asp-controller="Home" asp-action="Privacy">Privacy</a>
</li>
</ul>
</div>
</div>
</nav>
</header>
|
步骤13.完成主体部分
|
@*主体内容*@
<div class="container">
@*<partial
name="_CookieConsentPartial" />*@
<main role="main"
class="pb-3">
@RenderBody()
</main>
</div>
|
步骤14.完成页脚
|
@*页脚内容*@
<footer class="border-top
footer text-muted">
<div class="container">
© 2019 - TicTacToe - <a asp-area=""
asp-controller="Home" asp-action="Privacy">Privacy</a>
</div>
</footer>
|
步骤15.完成js
|
@*js环境定义*@
<environment
include="Development">
<script src="~/lib/jquery/dist/jquery.js"></script>
<script src="~/lib/bootstrap/dist/js/bootstrap.bundle.js"></script>
</environment>
<environment
exclude="Development">
<script src="https://cdnjs.cloudflare.com/ajax/libs/jquery/3.3.1/jquery.min.js"
asp-fallback-src="~/lib/jquery/dist/jquery.min.js"
asp-fallback-test="window.jQuery"
crossorigin="anonymous"
integrity="sha256-FgpCb/KJQlLNfOu91ta32o/NMZxltwRo8QtmkMRdAu8="></script>
<script src="https://stackpath.bootstrapcdn.com/bootstrap/4.3.1/js/bootstrap.bundle.min.js"
asp-fallback-src="~/lib/bootstrap/dist/js/bootstrap.bundle.min.js"
asp-fallback-test="window.jQuery && window.jQuery.fn
&& window.jQuery.fn.modal"
crossorigin="anonymous"
integrity="sha384-xrRywqdh3PHs8keKZN+8zzc5TX0GRTLCcmivcbNJWm2rs5C8PRhcEn3czEjhAO9o"></script>
</environment>
<script src="~/js/site.js"
asp-append-version="true"></script>
@RenderSection("Scripts", required: false)
|
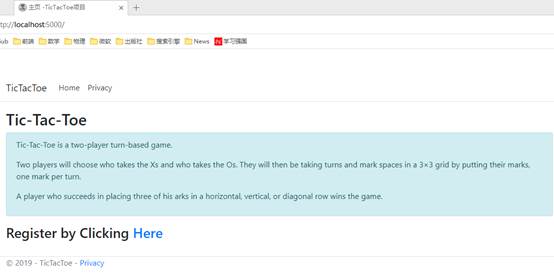
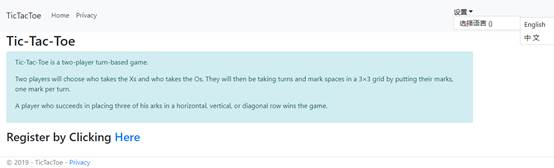
完成主页内容
步骤16.打开Views=>Home=>Index.cshtml文件并编辑
|
@{
ViewData["Title"] = "主页";
}
<div class="row">
<div class="col-lg-12">
<h2>Tic-Tac-Toe</h2>
<div class="alert
alert-info">
<p>Tic-Tac-Toe is a two-player turn-based game.</p>
<p>
Two players will choose who takes the Xs and who takes the Os.
They will then be taking turns and mark spaces in a
3×3 grid by putting their marks, one mark per turn.
</p>
<p>
A player who succeeds in placing three of his arks in a
horizontal, vertical, or diagonal row wins the
game.
</p>
</div>
<p>
<h3>
Register by Clicking
<a asp-controller="UserRegistration"
asp-action="Index">Here</a>
</h3>
</p>
</div>
</div>
|
简单配置执行第一次运行
步骤17.配置program.cs
步骤18.配置Startup.cs
|
public class Startup
{
public void ConfigureServices(IServiceCollection services)
{
services.AddRazorPages();//使用Razor视图
}
public void Configure(IApplicationBuilder app, IWebHostEnvironment
env)
{
if (env.IsDevelopment())
{
app.UseDeveloperExceptionPage();
}
app.UseStaticFiles();//使用静态文件
app.UseRouting();// 使用路由
app.UseEndpoints(endpoints =>
{
endpoints.MapDefaultControllerRoute();//使用默认控制器路由
});
}
}
|
步骤19.按F5开始第一次运行
创建注册页
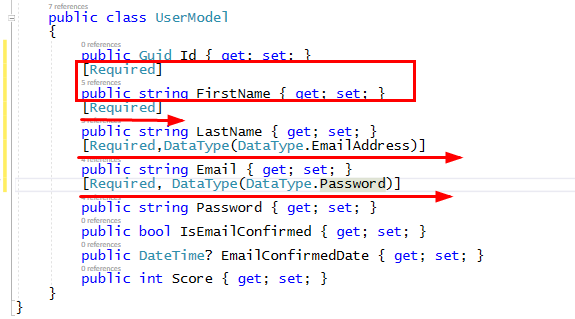
步骤20.在Models文件下新建UserModel类,来定义用户信息.
|
public class UserModel
{
public Guid Id
{ get; set; }
public string
FirstName { get; set; }
public string LastName
{ get; set; }
public string Email { get; set; }
public string Password
{ get; set; }
public bool
IsEmailConfirmed { get; set; }
public
DateTime? EmailConfirmedDate { get; set; }
public int Score { get; set; }
}
|
步骤21.在Controllers文件夹上右键新建UserRegistration控制器.
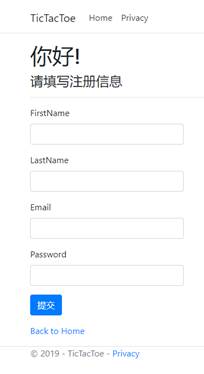
步骤22.在该控制器的Index方法上右键新建视图,视图基于UserModel自送生成.
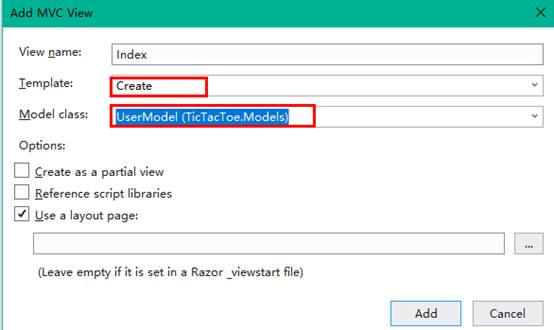
步骤23.只保留FirstName,LastName.Email和Password字段其余删除.按F5预览效果.
创建用户服务
开发人员在开发应用程序时面临的最大问题之一是组件间的依赖关系。这些依赖关系使组件难以单独维护和进化,因为修改可能会对其他依赖组件产生负面影响。但是,请放心,有一些机制允许打破这些依赖关系,其中之一就是DI。在提供松耦合的同时,DI允许组件一起工作。组件只需要知道由另一个组件实现的契约就可以使用它。对于DI容器,组件不会直接实例化,也不会使用静态引用来查找另一个组件的实例。相反,DI容器负责在运行时检索正确的实例。当一个组件在设计时考虑到DI,它在默认情况下是非常进化的,不依赖于任何其他组件或行为。例如,身份验证服务可以使用提供者进行使用DI的身份验证,并且,如果添加了新的提供者,现有的提供者将不会受到影响。
使用依赖项注入(DI)实现松耦合
依赖项注入的三种方式:
|
实现方式
|
意义
|
|
services.AddSingleton<,>
();
|
单例模式,整个声明周期唯一
|
|
services.AddTransient<,>();
|
瞬态模式,随叫随到模式.
|
|
services.AddScoped<,>();
|
范围模式,每个Http请求只有一次.
|
步骤24.创建用户服务,在Services文件夹下新建一个UserService类,完善后抽取接口.
|
namespace TicTacToe.Services
{
public interface
IUserService
{
Task<bool> IsOnline(string name);
Task<bool> RegisterUser(UserModel
usermodel);
}
public class UserService : IUserService
{
public Task<bool>
RegisterUser(UserModel usermodel)
{
return Task.FromResult(true);
}
public Task<bool>
IsOnline(string name)
{
return Task.FromResult(true);
}
}
}
|
步骤25.在注册控制器中应用构造函数注入该服务.
|
private readonly
IUserService _userService;
public UserRegistrationController(IUserService
userService)
{
_userService = userService;
}
|
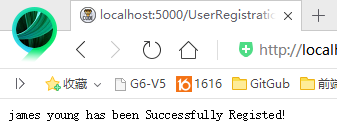
步骤26.搭建有注册页面Post回的数据处理函数
|
[HttpPost]
public async
Task<IActionResult> Index(UserModel userModel)
{
await _userService.RegisterUser(userModel);
return Content($"{userModel.FirstName} {userModel.LastName}
has been Successfully Registed!");
}
|
步骤27.在Startup.cs的configService函数中进行DI该服务.

步骤28.按F5,使用该服务测试
创建基础通讯中间件
中间件是ASP。NET Core 3的一部分用于处理请求和响应的请求管道。当它们被链接在一起时,它们可以将传入的请求从一个传递到另一个,并在管道中调用下一个中间件之前和之后执行操作.
使用中间件可以使您的应用程序更加灵活,因为您可以在Startup类的配置方法中轻松地添加和删除中间件。而且,在Configure方法中调用中间件的顺序与调用它们的顺序相同。建议按照以下顺序调用中间件,以确保更好的性能、功能和安全性:
l
异常处理中间件
l
静态文件中间件
l
授权中间件
l
MVC中间件
如果您没有按照这个顺序调用它们,您可能会得到一些意料之外的行为甚至错误,因为中间件动作可能在请求管道中应用得太晚或太早了。
Authentication(授权)
CORS(基于Http报头的跨源资源共享保护)
Response caching
/compression(响应的缓存/压缩)
routing,Session,Static
Files ,URL rewriting
内置的中间件将足以满足最基本的需求和标准用例,但是您肯定需要创建自己的中间件。有两种方法可以做到这一点:在Startup类中以内联方式创建它们,或者在自包含类中创建它们(扩展).
内联定义中间件的四种方法:Run,Map,MapWhen,Use.
Run方法用于添加中间件并立即返回响应,从而缩短请求管道。它不调用以下任何中间件,并结束请求管道。因此,建议将其放在中间件调用的末尾(请参阅前面讨论的中间件排序)。
如果请求路径以特定路径开始,则Map方法允许执行某个分支并添加相应的中间件,这意味着您可以有效地对请求管道进行分支。
MapWhen方法提供了与分支请求管道和添加特定中间件基本相同的概念,但是控制了分支条件,因为它基于Func<HttpContext, bool>谓词的结果。
Use方法添加了中间件,可以在线调用下一个中间件,也可以使请求管道短路。但是,如果希望在执行特定操作之后传递请求,则必须使用next手动调用下一个中间件。使用当前上下文作为参数进行调用。
创建通讯中间件
步骤28.在Middlewares文件夹下创建CommunicationMiddleware.cs类文件.
|
public class
CommunicationMiddleware
{
private readonly RequestDelegate _next;
private readonly IUserService _userService;
public CommunicationMiddleware(RequestDelegate next, IUserService userService)
{
_next = next;
_userService = userService;
}
public async Task Invoke(HttpContext context)
{
await _next.Invoke(context);
}
}
|
步骤29.在Extensions文件夹新建CommunicationMiddlewareExtension.cs类
|
namespace TicTacToe.Extensions
{
public static
class CommunicationMiddlewareExtension
{
public static
IApplicationBuilder UseCommunicationMiddleware(this
IApplicationBuilder app)
{
return
app.UseMiddleware<CommunicationMiddleware>();
}
}
}
|
步骤30.在Startup.cs中的Configure方法中配置中间件管线.
|
app.UseCommunicationMiddleware();
|
使用静态文件
步骤31.在Configure方法中添加使用静态文件,在ConfigureService方法中添加AddDirectoryBrowser服务,对应的在管线方法中添加UseDirectoryBrowser中间件.F5运行,运行后注释掉.
使用routing(路由),URL重定向和URL重写功能
在构建应用程序时,使用路由将传入请求映射到路由处理程序(URL匹配),并为响应生成URL (URL生成)。ASP。NET Core 3的路由功能结合并统一了MVC和web API的路由功能。它们从头开始重新构建,以创建一个通用的路由框架,该框架将所有不同的功能放在一个地方,所有类型的ASP都可以使用。NET Core 3项目。多数情况下,这是基于URL中的数据完成的,但是对于更高级的场景,您也可以在请求中使用任何数据。如果使用MVC中间件,可以在Startup类中定义和创建路由,如本章开头所示。这是开始URL匹配和URL生成的最简单方法.
步骤32.给应用添加路由服务,并配置默认路由规则
步骤33.配置用户注册服务.在CS中添加AddSingleton<IUserService,
UserService>,在Config方法中实现服务.
|
var routeBuilder = new
RouteBuilder(app);
routeBuilder.MapGet("CreateUser", context =>
{
var fn = context.Request.Query["FirstName"];
var ln = context.Request.Query["LastName"];
var em = context.Request.Query["Email"];
var
pw = context.Request.Query["Password"];
var userService =
context.RequestServices.GetRequiredService<IUserService>();
userService.RegisterUser(new Models.UserModel
{ FirstName = fn, LastName = ln, Email = em, Password = pw });
return context.Response.WriteAsync($"用户{fn} {ln} 已经顺利注册!");
});
var newUserRoutes = routeBuilder.Build();
app.UseRouter(newUserRoutes);
|

URL重定向需要到服务器的往返,在客户端完成。客户端首先接收一个移动的永久301或移动的临时302 HTTP状态码,这表示将使用新的重定向URL。然后,客户端调用新的URL来检索请求的资源,这样客户端就可以看到它了。
另一方面,URL重写纯粹是服务器端。服务器将从内部从不同的资源地址检索请求的资源。客户端将不知道资源是从另一个URL提供的,因为它对客户端是不可见的。
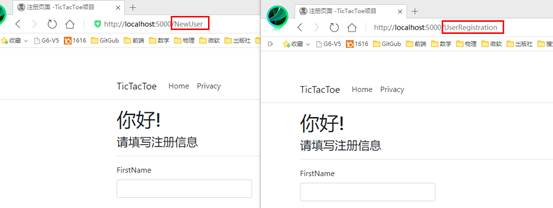
步骤34.添加注册页面的重写路径,在UseRouting()之前.
|
//添加重写规则
var option = new
RewriteOptions().AddRewrite("NewUser", "/UserRegistration/Index", false);
app.UseRewriter(option);
|
ANC3中的端点路由
端点路由在其早期的概念中也被称为dispatcher.默认情况下,推荐用于ANC3。如果你用过ASP。NET Core 2.0在和更早的版本中,您会发现大多数应用程序要么使用RouteBuilder(如前面的示例所示),要么使用route属性(如果您正在开发api,我们将在后面的章节中讨论)。您将熟悉UseMVC()和/或UseRouter()方法,它们将继续在ASP中工作。NET Core 3,但是端点路由被设计为允许开发人员使用不打算使用MVC的应用程序,但仍然使用路由来处理请求。
使用UseMvc方法定义路由:
|
app.UseMvc(route=>{
route.MapRoute(name:"default",template:"{controller=Home}/{action=Index}/{id?}");
});
|
使用端点实现路由的方式:
|
app.UseRouting();// 使用路由
//定义默认路由
app.UseEndpoints(endpoints =>
{
endpoints.MapControllerRoute(name: "default",
pattern: "{controller=Home}/{action=Index}/{id?}");
endpoints.MapRazorPages();
endpoints.MapControllers();
});
|
这个实现中,我们使用端点代替MVC,因此我们不需要添加专门MVC ConfigureServices方法,这仅仅使实现更轻量级,裁剪的开销MVC,虽然它是相当重要的,当我们构建应用程序,不一定需要遵循MVC架构。我们的应用程序开始增长,遇到错误的机会也在增加。在下一节中,让我们看看如何将错误处理添加到我们的应用程序中。
添加错误处理
在开发应用程序时,问题不是错误和bug是否会发生,而是它们何时发生。这个问题有两个解决方案,需要同时应用单元测试和错误处理。从应用程序的角度来看,单元测试将确保在开发期间正确的行为,而错误处理将帮助您在运行时为环境问题做好准备。我们将看看如何添加有效的错误处理到您的ASP。NET
Core 3的应用程序。默认情况下,如果根本没有错误处理,并且发生了异常,那么您的应用程序将会停止,用户将不能再使用它,在最坏的情况下,服务将会中断。
在开发期间要做的第一件事是激活默认的开发异常页面;它显示发生异常的详细信息。在本章的开头,您已经看到了如何做到这一点.

在默认的开发异常页面上,您可以深入分析原始异常细节以分析堆栈跟踪。您有多个选项卡,可以查看查询字符串参数、客户端cookie和请求头。这些都是强有力的指标,能让你更好地理解发生了什么,为什么会发生。
但是,不建议在生产环境中使用默认的开发异常页面,因为它包含了太多关于您的系统的信息,这些信息可能会危害您的系统。对于生产环境,建议使用静态内容配置专用错误页面。在下面的示例中,您可以看到在开发期间使用默认的开发异常页面,如果将应用程序配置为在非开发环境中运行,则会显示特定的错误页面.
步骤35.完善不同环境下的错误处理方式.
|
if (env.IsDevelopment())
{
app.UseDeveloperExceptionPage();
}
else
{
app.UseExceptionHandler("/Home/Error");
}
|
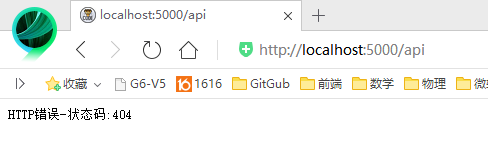
默认情况下,任何信息显示在400年和599年之间的HTTP错误代码。这包括,例如,404(未找到)和500(内部服务器错误)。用户会看到一个空白的页面,它不是非常友好。你应该激活特定UseStatusCodePages中间件启动类。这将帮助您定制需要显示在这种情况下。
步骤36.使用状态码页
|
app.UseStatusCodePages("text/plain","HTTP错误-状态码:{0}");
|
也可以对错误码的处理更加细化.app.UseStatusCodePagesWithRedirects("/error/{0}");app.UseStatusCodePagesWithReExecute("/error/{0}");
模型的验证
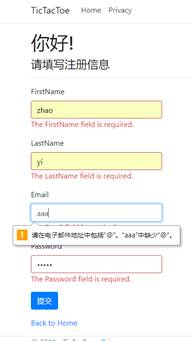
如果我们回到UserRegisterController实现,我们可以看到它有多个缺陷。如果字段没有正确填写或根本没有填写该怎么办?如果模型定义没有得到尊重呢?
步骤37.给UserModel添加约束
步骤38.给返回的HttpPost进行进一步约束
|
[HttpPost]
public async
Task<IActionResult> Index(UserModel userModel)
{
if (ModelState.IsValid) //如果返回的数据验证格式都正确
{
await _userService.RegisterUser(userModel);
return Content($"{userModel.FirstName} {userModel.LastName}
has been Successfully Registed!");
}
else {
return View(userModel); //数据打回
}
}
|
ASP.NET Core3的基本概念之二
在本部分主要介绍以下内容:1.使用js客户端开发,并打包和最小化文件2.使用websocket进行实时通讯3.使用进程和缓存4.应用全球化与本地化进行多国语言5.配置应用与服务6.高级DI概念7.一次生成多环境运行
使用js开发客户端
与井字游戏应用程序的初始工作流相比,我们可以看到还缺少很多东西,比如处理整个客户端部分、实际处理通信中间件,以及我们仍然需要实现的多个其他功能。让我们从客户端部分开始,学习如何应用更高级的技术。然后,我们将学习如何尽可能优化一切。
基础email确认功能
步骤39.在用户注册控制器中添加EmailConfirmation方法
|
[HttpGet]
public IActionResult EmailConfirmation(string email)
{
ViewBag.Email = email;
return View();
}
|
步骤40.生成EmailConfirmation视图页面
|
@{
ViewData["Title"] = "邮件确认";
}
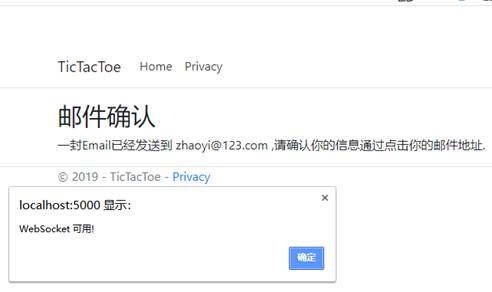
<h2>邮件确认</h2>
一封Email已经发送到@ViewBag.Email ,请确认你的信息通过点击你的邮件地址.
|
步骤41.更改[Post]
Index方法令其重定向
|
[HttpPost]
public async
Task<IActionResult> Index(UserModel userModel)
{
if (ModelState.IsValid) //如果返回的数据验证格式都正确
{
await _userService.RegisterUser(userModel);
//return Content($"{userModel.FirstName}
{userModel.LastName} has been Successfully Registed!");
return RedirectToAction("EmailConfirmation",
new { userModel.Email })
}
else
{
return View(userModel); //数据打回
}
}
|
用户的电邮确认(模拟过程)
步骤42.改进用户服务接口(仓库接口),实现异步的用户注册,GetUserByEmail,和更新用户三个方法声明.
|
public interface IUserService
{
// Task<bool>
IsOnline(string name);
Task<bool> RegisterUser(UserModel
usermodel);
Task<UserModel> GetUserByEmail(string email);
Task
UpdateUser(UserModel user);
}
|
步骤43.用户服务的具体实现(仓库)
|
public class UserService : IUserService
{
//静态用户数据库(模拟)
private static
ConcurrentBag<UserModel> _userStore;
static UserService()
{
_userStore = new
ConcurrentBag<UserModel>();
}
public Task<UserModel> GetUserByEmail(string email)
{
return
Task.FromResult(_userStore.FirstOrDefault(o => o.Email == email));
}
public Task<bool>
RegisterUser(UserModel usermodel)
{
_userStore.Add(usermodel);
return Task.FromResult(true);
}
public Task UpdateUser(UserModel user)
{
_userStore = new
ConcurrentBag<UserModel>(_userStore.Where(u => u.Email !=
user.Email)) { user };
return Task.CompletedTask;
}
}
|
步骤44.创建游戏邀请模型
|
public class
GameInvitationModel
{
public Guid Id { get; set; }
public string EmailTo { get; set;
}
public string InvitedBy { get; set;
}
public bool IsConfirmed { get; set;
}
public DateTime ConfirmedDate { get; set;
}
}
|
步骤45.创建游戏邀请控制器,构造方法注入仓库接口并实现默认Index方法.
|
public class
GameInvitationController :
Controller
{
private readonly IUserService _userService;
public GameInvitationController(IUserService us)
{
_userService = us;
}
[HttpGet]
public IActionResult Index(string email)
{
var gim = new GameInvitationModel { InvitedBy = email };
return View(gim);
}
}
|
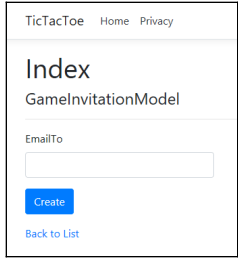
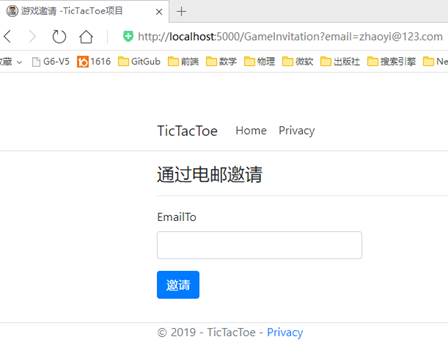
步骤46.创建对应的Index视图,利用游戏邀请模型,只保留EmailTo字段.

步骤47.返回UserRegistration控制器,对[GET] EmailConfirmation方法实施跨控制器重定向.
|
[HttpGet]
public async
Task<IActionResult> EmailConfirmation(string
email)
{
var user = await
_userService.GetUserByEmail(email);
if (user?.IsEmailConfirmed == true)
{
return RedirectToAction("Index", "GameInvitation",
new { email = email });
}
else
{
ViewBag.Email = email;
user.IsEmailConfirmed = true;
user.EmailConfirmedDate = DateTime.Now;
await _userService.UpdateUser(user);
return View();
}
}
|
步骤48.F5运行,填写表格后再按F5刷新
使用XMLHttpRequest技术
实现自刷新的方式有:1.Html meta标签的refresh属性(不推荐),2.简单JS程序刷新(不推荐).3.利用Jquery的XMLHttpRequest(XHR)技术(推荐).
XHR实现流程:1.更新网页而不重新载入,2.页面加载后还可以从服务器请求和接收数据3.将数据发送到后台服务器.
步骤49.在wwwroot目录下新建app/js目录.新建scripts1.js.创建EmailConfirmation函数
|
var interval;
function EmailConfirmation(email)
{
interval = setInterval(() => { CheckEmailConfirmationStatus(email) },
1000);
}
|
步骤50.继续新建scripts2.js利用jquery实现CheckEmailConfirmationStatus函数
|
function
CheckEmailConfirmationStatus(email) {
$.get("/CheckEmailConfirmationStatus?email="
+ email, function (data) {
if (data == "OK")
{
if (interval !== null)
{
clearInterval(interval);
//alert("OK");
window.location.href = "/GameInvitation?email="
+ email;
}
}
});
}
|
步骤51.在Layout页面的js开发版中引入这两个脚本

步骤52.通信中间件的细化实现
|
public async Task Invoke(HttpContext context)
{
// await _next.Invoke(context);
if (context.Request.Path.Equals("/CheckEmailConfirmationStatus"))
{
await
ProcessEmailConfirmation(context);
}
else
{
await _next?.Invoke(context);
}
}
private async
Task ProcessEmailConfirmation(HttpContext
context)
{
var email = context.Request.Query["email"];
var user = await
_userService.GetUserByEmail(email);
if (string.IsNullOrEmpty(email))
{
await context.Response.WriteAsync("坏请求,Email是必须的!");
}
else if ((await
_userService.GetUserByEmail(email)).IsEmailConfirmed)
{
await context.Response.WriteAsync("OK");
}
else
{
await context.Response.WriteAsync("等待Email确认");
user.IsEmailConfirmed = true;
user.EmailConfirmedDate = DateTime.Now;
_userService.UpdateUser(user).Wait();
}
nbsp;
}
|
步骤53.更新EmailConfirmation视图, 通过在页面底部添加对JavaScript邮件确认函数的调用.
|
@section Scripts{
<script>
$(document).ready(function () {
EmailConfirmation('@ViewBag.Email'); });
</script>
}
|
步骤54. 返回UserRegistration控制器,对[GET] EmailConfirmation方法,屏蔽如下代码:
|
//user.IsEmailConfirmed = true;
//user.EmailConfirmedDate = DateTime.Now;
//await _userService.UpdateUser(user);
|
步骤55.返回scripts2.js修改让其实现自动重定向
|
if (interval !== null) {
clearInterval(interval);
//alert("OK");
window.location.href = "/GameInvitation?email="
+ email;
}
|
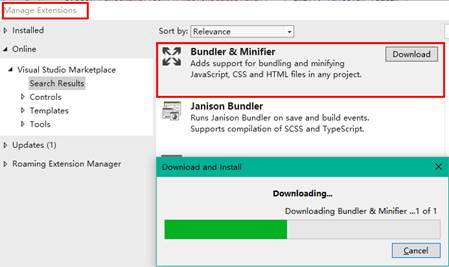
使用B&M压缩脚本
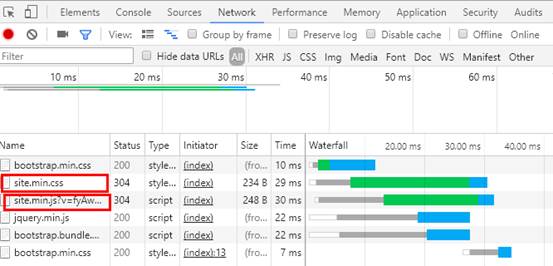
在生产环境中运行时拥有如此多的文件可能会导致性能和带宽问题。这就是为什么在构建过程中,在生成最终的发布包之前,一切都必须进行优化,这意味着JavaScript和CSS文件必须被绑定和缩小。TypeScript和CoffeeScript文件必须转换成JavaScript。绑定和缩小是可以用来提高web应用程序的页面加载性能的两种技术。绑定允许您将多个文件合并到一个文件中,而小型化优化了JavaScript和CSS文件的代码,以实现更小的有效负载。
ANC3支持的B&M工具有:VS B&M扩展,Gulp和Grunt.
步骤56.安装VS B&M扩展工具
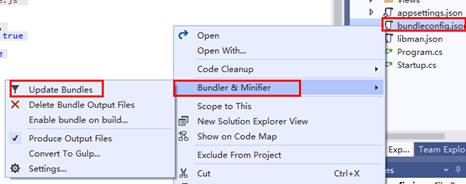
步骤57.安装后重启项目,在根目录下新建bundlerconfig.json配置文件,

|
[
{
"outputFileName": "wwwroot/css/site.min.css",
"inputFiles": [
"wwwroot/css/site.css"
]
},
{
"outputFileName": "wwwroot/js/site.js",
"inputFiles": [
"wwwroot/app/js/scripts1.js",
"wwwroot/app/js/scripts2.js"
],
"sourceMap": true,
"includeInProject": true
},
{
"outputFileName": "wwwroot/js/site.min.js",
"inputFiles": [
"wwwroot/js/site.js"
],
"minify": {
"enabled": true,
"renameLocals": true
},
"sourceMap": false
}
]
|
步骤58.执行B&M操作
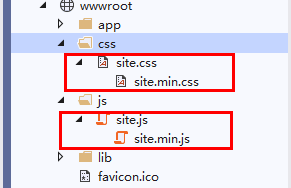
步骤59.把压缩后的min.css 和min.js替换之前的引用
使用WebSockets进行实时通讯
仍然有一些改进的空间。实际上,客户端定期向服务器端发送请求,以查看电子邮件确认状态是否发生了更改。这可能会导致许多请求,以查看是否有状态更改。此外,服务器端不能在确认电子邮件后立即通知客户端,因为它必须等待客户端请求的响应。在本节中,您将了解WebSockets (https://docs.microsoft.com/en-us/aspnet/core/fundamentals/websockets)的概念,以及它们如何让您进一步优化客户端实现。
WebSockets支持TCP上的持久双向通信通道,这对于需要运行实时通信场景(聊天、股票行情、游戏等)的应用程序来说特别有趣。碰巧我们的示例应用程序是一个游戏,它是主要的应用程序类型之一,主要受益于直接使用套接字连接。
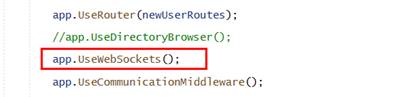
步骤60.回到Startup.cs中Configure方法中在使用通讯中间件前,添加UseWebSocket()
步骤61.回到通讯中间件类中,添加两个方法异步发送字符SendStringAsync,和异步接受字符ReceiveStringAsync
|
//利用Websocket
异步发送字串
private static Task SendStringAsync(WebSocket socket, string data, CancellationToken ct = default(CancellationToken))
{
var buffer = Encoding.UTF8.GetBytes(data);
var segment = new ArraySegment<byte>(buffer);
return socket.SendAsync(segment, WebSocketMessageType.Text, true,
ct);
}
//利用webSocket异步接受字串
private static async Task<string>
ReceiveStringAsync(WebSocket socket, CancellationToken ct = default(CancellationToken))
{
var buffer = new ArraySegment<byte>(new
byte[8192]);
using (var ms = new
MemoryStream())
{
WebSocketReceiveResult result;
do
{
ct.ThrowIfCancellationRequested();
result = await socket.ReceiveAsync(buffer, ct);
ms.Write(buffer.Array, buffer.Offset, result.Count);
} while (!result.EndOfMessage);
if (result.MessageType != WebSocketMessageType.Text)
{
throw new Exception("不期望的消息");
}
else
{
using (var reader = new
StreamReader(ms, Encoding.UTF8))
{
return await reader.ReadToEndAsync();
}
}
}
}
|
步骤62.利用Websocket技术更新ProcessEmailConfirmation方法.
|
private async
Task ProcessEmailConfirmation(HttpContext context, WebSocket socket,
CancellationToken ct, string email)
{
UserModel user = await
_userService.GetUserByEmail(email);
while (!ct.IsCancellationRequested &&
!socket.CloseStatus.HasValue && user?.IsEmailConfirmed == false)
{
if (user.IsEmailConfirmed)
await SendStringAsync(socket, "OK", ct);
else
{
user.IsEmailConfirmed = true;
user.EmailConfirmedDate
= DateTime.Now;
await _userService.UpdateUser(user);
await SendStringAsync(socket, "OK", ct);
}
Task.Delay(500).Wait();
user = await
_userService.GetUserByEmail(email);
}
|
步骤63.更新上面的Invoke方法
|
public async
Task Invoke(HttpContext context)
{
// await _next.Invoke(context);
if (context.WebSockets.IsWebSocketRequest)
{
var webSocket = await
context.WebSockets.AcceptWebSocketAsync();
var ct = context.RequestAborted;
var json = await
ReceiveStringAsync(webSocket, ct);
var cmd = JsonConvert.DeserializeObject<dynamic>(json);
switch (cmd.Operation.ToString())
{
case "CheckEmailConfirmationStatus":
await ProcessEmailConfirmation(context,
webSocket, ct, cmd.Parameters.ToString());
break;
}
}
else if()//…
}
|
步骤64.更新scripts1.js
|
var interval;
function EmailConfirmation(email)
{
if (window.WebSocket) {
alert("WebSocket 可用!");
openSocket(email, "Email");
}
else {
alert("WebSocket不可用")
interval = setInterval(() => { CheckEmailConfirmationStatus(email) },
1000);
}
}
|
步骤65.更新scripts2.js
|
var openSocket = function (parameter, strAction) {
if (interval != null)
{
clearInterval(interval);
}
var protocol = location.protocol === "https:" ? "wss:"
: "ws:";
var operation = "";
var wsUri = "";
if (strAction == "Email")
{
wsUri = protocol + "//" +
window.location.host + "/CheckEmailConfirmationStatus";
}
var socket = new
WebSocket(wsUri);
socket.onmessage = function (response) {
console.log(response);
if (strAction == "Email"
&& response.data == "OK")
{
window.location.href = "/GameInvitation?email="
+ parameter;
}
};
socket.onopen = function () {
var json = JSON.stringify({ "Operation": operation, "Parameters": parameter });
socket.send(json);
};
socket.onclose = function (event) { };
};
|
随着web应用程序越来越繁忙,我们可能希望尽量减少不必要的往返,即请求可以保存一段时间的数据以供检索和使用。让我们看看如何通过引入会话和用户缓存管理来实现这一点。
会话与缓存
作为web开发人员,您可能知道HTTP是一种无状态协议,这意味着在默认情况下,没有会话的概念。每个请求都是独立处理的,不同请求之间不保留任何值。然而,处理数据有不同的方法。您可以使用查询字符串、提交表单数据,或者使用cookie在客户机上存储数据。然而,所有这些机制或多或少都是手动的,需要您自己来管理。如果你是一个有经验的ASP。NET 开发者,您将熟悉会话状态和会话变量的概念。这些变量存储在web服务器上,您可以在不同的用户请求期间访问它们,这样您就有了一个存储和接收数据的中心位置。会话状态是存储特定于会话的用户数据的理想状态,不需要永久持久性。ASP。NET
Core 3通过使用专用的会话中间件提供了会话状态和会话变量。基本上,有两种不同类型的会话提供程序:1.内存中的会话提供程序(本地到单个服务器)2.分布式会话提供程序(在多个服务器之间共享).
内存会话提供者(In-memory session providers)
步骤66.在Layout页面的导航栏中添加语言下拉菜单
|
<div class="my-nav-list">
<ul>
<li class="dropdown">
<a class="dropdown-toggle" data-toggle="dropdown"
href="#">设置<span class="caret"></span></a>
<ul class="dropdown-menu
multi-level">
<li class="dropdown-submenu">
<a class="dropdown-toggle" data-toggle="dropdown"
href="#">
选择语言 (@ViewBag.Language)
<span class="caret"></span>
</a>
<ul class="dropdown-menu">
<li @(ViewBag.Language == "EN" ? "active" : "")>
<a asp-controller="Home" asp-action="SetCulture"
asp-route-culture="EN"> English</a>
</li>
<li> </li>
<li @(ViewBag.Language
== "CN" ? "active" : "")>
<a asp-controller="Home" asp-action="SetCulture"
asp-route-culture="CN"> 中 文</a>
</li>
</ul>
</li>
</ul>
</li>
</ul>
</div>
@*下拉菜单创建完毕*@
|
步骤67.打开HomeController添加一个新方法SetCulture
|
public
IActionResult SetCulture(string culture)
{
Request.HttpContext.Session.SetString("culture",
culture);
return RedirectToAction("Index");
}
|
步骤68.更新相应的Index方法
|
public
IActionResult Index()
{
var culture = Request.HttpContext.Session.GetString("culture");
ViewBag.Language = culture;
return View();
}
|
步骤69.创建下拉菜单的样式及行为
|
.dropdown-submenu {
position: relative;
}
.dropdown-submenu > .dropdown-menu {
top:
0;
left:
100%;
margin-top: -6px;
margin-left: -1px;
-webkit-border-radius: 0 6px 6px 6px;
-moz-border-radius: 0 6px 6px;
border-radius: 0 6px 6px 6px;
}
.dropdown-submenu:hover > .dropdown-menu {
display: block;
}
.dropdown-submenu > a:after {
display: block;
content: " ";
float:
right;
width:
0;
height:
0;
border-color: transparent;
border-style: solid;
border-width: 5px 0 5px 5px;
border-left-color: #ccc;
margin-top: 5px;
margin-right: -10px;
}
.dropdown-submenu:hover > a:after {
border-left-color: #fff;
}
.dropdown-submenu.pull-left {
float:
none;
}
.dropdown-submenu.pull-left > .dropdown-menu {
left: -100%;
margin-left: 10px;
-webkit-border-radius: 6px 0 6px 6px;
-moz-border-radius: 6px 0 6px 6px;
border-radius: 6px 0 6px 6px;
}
|
步骤70.给Startup.cs中的ConfigureService方法中添加Session服务,给Configure方法添加Session中间件.
services.AddSession(o => { o.IdleTimeout =
TimeSpan.FromMinutes(30); });
app.UseSession();
|
步骤71.在GameInvitationController控制器中的Index方法中加入会话
|
[HttpGet]
public
IActionResult Index(string email)
{
var gim = new GameInvitationModel { InvitedBy =
email };
HttpContext.Session.SetString("email", email);
return View(gim);
}
|
分布式会话提供者(Distributed session providers)
大多数情况下,您将拥有多个web服务器,而不是一个,特别是在当今的云环境中。那么,如何将会话状态存储在内存之外的分布式缓存中呢?这很简单,你只需要在Startup类中注册额外的服务。这些附加服务将提供此功能。这里有一些例子:
|
//分布式内存缓存
services.AddDistributedMemoryCache();
//分布式SQL Server 缓存
services.AddDistributedSqlServerCache(o =>
{
o.ConnectionString =
_configuration["DatabaseConnection"];
o.SchemaName = "dbo";
o.TableName = "sessions";
});
//分布式 Redis 缓存
services.AddDistributedRedisCache(o =>
{
o.Configuration =
_configuration["CacheRedis:Connection"];
o.InstanceName = _configuration
["CacheRedis:InstanceName"];
});
|
应用全球化与本地化多语言接口
应该从项目一开始就考虑应用程序的本地化,特别是在使用ASP时,这是非常容易和直接的。NET Core 3框架。它为此提供了现有的服务和中间件。为显示、输入和输出构建支持不同语言和文化的应用程序称为全球化,而使全球化应用程序适应特定文化称为本地化。
ANC3提供了三种不同的本地化的方法:1.字串本地化;2.视图本地化;3.数据注释的本地化;
全球化与本地化的概念
首先实现字串的本地化
步骤72.进入Services文件夹创建CultureProviderResolverService.cs类继承自RequestCultureProvider.
步骤73.实现父类的DetermineProviderCultureResult方法,定义所需的静态只读变量
|
namespace TicTacToe.Services
{
public class CultureProviderResolverService :
RequestCultureProvider
{
private static
readonly char[]
_cookieSeparator = new[] { '|' };
private static
readonly string
_culturePrefix = "c=";
private static
readonly string
_uiCulturePrefix = "uic=";
public override
Task<ProviderCultureResult> DetermineProviderCultureResult(HttpContext
httpContext)
{
throw new
NotImplementedException();
}
}
}
|
步骤74.完成重写方法
|
public override
async Task<ProviderCultureResult>
DetermineProviderCultureResult(HttpContext httpContext)
{
if (GetCultureFromQueryString(httpContext, out string
culture))
return new
ProviderCultureResult(culture, culture);
else if
(GetCultureFromCookie(httpContext, out
culture))
return new
ProviderCultureResult(culture, culture);
else if
(GetCultureFromSession(httpContext, culture))
return new
ProviderCultureResult(culture, culture);
else
return await
NullProviderCultureResult;
}
|
步骤75.实现GetCultureFromQueryString方法
|
private bool
GetCultureFromQueryString(HttpContext httpContext, out
string culture)
{
if (httpContext == null)
{
throw new
ArgumentNullException("httpContext");
}
var request = httpContext.Request;
if (!request.QueryString.HasValue)
{
culture = null;
return false;
}
culture = request.Query["culture"];
return true;
}
|
步骤76.实现GetCultureFromSession方法
|
private bool
GetCultureFromSession(HttpContext httpContext, out
string culture)
{
culture = httpContext.Session.GetString("culture");
return !string.IsNullOrEmpty(culture);
}
|
步骤77.实现GetCultureFromCookie方法
|
private bool
GetCultureFromCookie(HttpContext httpContext, out
string culture)
{
if (httpContext == null)
{
throw new
ArgumentNullException("httpContext");
}
var cookie = httpContext.Request.Cookies["culture"];
if (string.IsNullOrEmpty(cookie))
{
culture = null;
return false;
}
culture = ParseCookieValue(cookie);
return !string.IsNullOrEmpty(culture);
}
|
步骤78.实现上述方法中的ParseCookieValue方法
|
private string
ParseCookieValue(string cookie)
{
if (string.IsNullOrWhiteSpace(cookie))
{
return null;
}
var parts = cookie.Split(_cookieSeparator,
StringSplitOptions.RemoveEmptyEntries);
if (parts.Length != 2)
{
return null;
}
var potentialCultureName = parts[0];
var potentialUICultureName = parts[1];
if
(!potentialCultureName.StartsWith(_culturePrefix) ||
!potentialUICultureName.StartsWith(_uiCulturePrefix))
{
return null;
}
var cultureName =
potentialCultureName.Substring(_culturePrefix.Length);
var uiCultureName =
potentialUICultureName.Substring(_uiCulturePrefix.Length);
if (cultureName == null
&& uiCultureName == null)
{
return null;
}
if (cultureName != null
&& uiCultureName == null)
{
uiCultureName = cultureName;
}
if (cultureName == null
&& uiCultureName != null)
{
cultureName = uiCultureName;
}
return cultureName;
}
|
步骤79.配置Startup.cs 中的CS
|
services.AddLocalization(o
=> o.ResourcesPath = "Localization");
|
步骤80.配置Configure方法
|
var supportedCultures =
CultureInfo.GetCultures(CultureTypes.AllCultures);
var localizationOptions = new RequestLocalizationOptions
{
DefaultRequestCulture = new RequestCulture("en-US"),
SupportedCultures = supportedCultures,
SupportedUICultures = supportedCultures
};
localizationOptions.RequestCultureProviders.Clear();
localizationOptions.RequestCultureProviders.Add(new
CultureProviderResolverService());
app.UseRequestLocalization(localizationOptions);
|
应用获取用户本地化的四种手段:通过URI的查询字串,2.Cookies3.浏览器的语言设置4.自定义(本例).
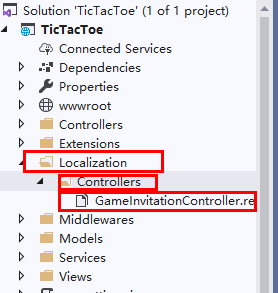
步骤81.在项目根目录下创建一个Localization的文件夹,在其下创建Controllers文件夹并添加GameInvitationController的资源文件(.resx).
步骤82.打开资源文件添加如下键值

步骤83 继续创建GameInvitationController.cn.resx文件并添加如下键值

步骤83.转至GameInvitation控制器,添加stringLocalizer并更新构造函数

步骤84. 添加[Post] Index方法
|
[HttpPost]
public IActionResult
Index(GameInvitationModel model)
{
return Content(_stringLocalizer["GameInvitationConfirmationMessage",model.EmailTo]);
}
|
视图的本地化
步骤85.配置Startup.cs 的服务配置函数添加Mvc
|
services.AddMvc().AddViewLocalization(LanguageViewLocationExpanderFormat.Suffix,
opt => opt.ResourcesPath = "Localization");
|
步骤86.视图导入添加Localization 和注入 IViewLocalizer
|
@using
Microsoft.AspNetCore.Mvc.Localization
@inject IViewLocalizer Localizer
|
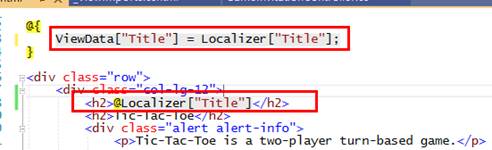
步骤87.进入主视图,现修改title的本地化
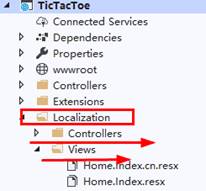
步骤88.在Localization文件夹下新建Views文件夹,分别添加Home.Index.resx 和Home.Index.cn.resx 两个资源文件
步骤89.给两个资源文件添加Title字段,并赋值
步骤90.同理可以把所需的其他内容全部变量化
数据注释的本地化
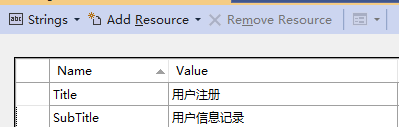
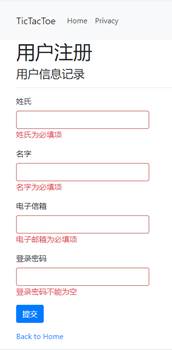
步骤91.在Localization/Views下创建两个资源文件分别为:UserRegistration.Index.resx和UserRegistration.Index.zh.resx
步骤92.打开UserRegistration.Index.resx文件添加Title和SubTitle两个字段并赋值
步骤93. 打开UserRegistration.Index.zh.resx文件添加Title和SubTitle两个字段并赋值
步骤94.转到用户注册控制器的Index方法视图.

步骤94.为了使该页面的数据验证也能出现多国语言,需要在Startup的服务配置中设置
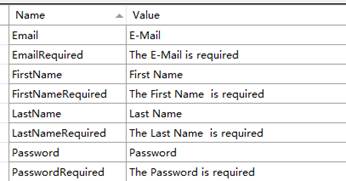
步骤95.在Localization文件夹里新建Models文件夹,并新建UserModel.resx和UserModel.zh.resx.并把模型的所有字段名全部双语化.
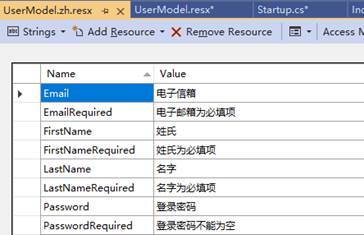
步骤96.给UserModel.cs中的数据字段加上Display修饰对应resx中的键名
|
[Display(Name = "FirstName")]
[Required(ErrorMessage = "FirstNameRequired")]
public string
FirstName { get; set;
}
[Display(Name = "LastName")]
[Required(ErrorMessage = "LastNameRequired")]
public string LastName { get;
set; }
[Display(Name = "Email")]
[Required(ErrorMessage = "EmailRequired"),
DataType(DataType.EmailAddress)]
public string
Email { get; set;
}
[Display(Name = "Password")]
[Required(ErrorMessage = "PasswordRequired"),
DataType(DataType.Password)]
public string
Password { get; set;
}
|
配置应用与服务
在前面几节中,您已经通过向用户注册过程添加缺少的组件,甚至本地化井字游戏应用程序的某些部分而取得了进展。但是,您总是通过在代码中以编程方式设置用户确认来模拟确认电子邮件。在这一节中,我们将修改这一部分,以便我们确实向新注册的用户发送电子邮件,并使一切都完全可配置。
添加一个电子邮件服务
步骤97.在Services文件夹下添加EmailService.cs类并添加SendEmail方法
|
public class
EmailService
{
public Task SendEmail(string emailTo, string
subject, string message)
{
return Task.CompletedTask;
}
}
|
步骤98.抽出抽象接口
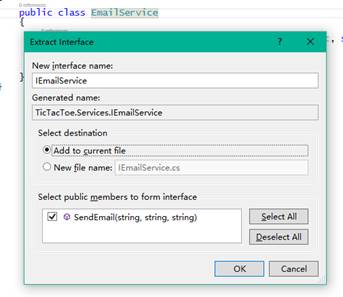
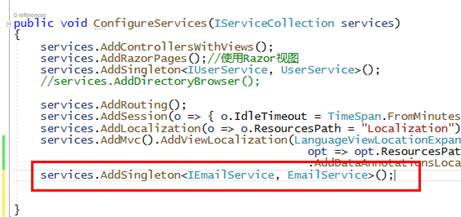
步骤99.在服务配置中添加单例依赖性注入.
步骤100.给UserRegistration控制器进行构造函数注入
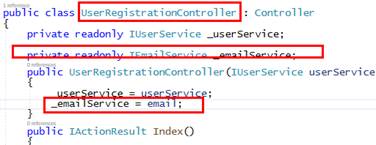
步骤101.对UserRegistration控制器的EmailConfirmation方法进行更新
|
[HttpGet]
public async
Task<IActionResult> EmailConfirmation(string
email)
{
var user = await
_userService.GetUserByEmail(email);
var urlAction = new
UrlActionContext
{
Action = "ConfirmEmail",
Controller = "UserRegistration",
Values = new { email },
Protocol = Request.Scheme,
Host = Request.Host.ToString()
};
var message = $"Thank
you for your registration on our website," +
$"Please click here to confirm your
email" +
$"{Url.Action(urlAction)}";
try
{
_emailService.SendEmail(email, "Tic-Tac-Toe
Email Confirmation", message).Wait();
}
catch (Exception e)
{
}
if (user?.IsEmailConfirmed == true)
return RedirectToAction("Index", "GameInvitation",
new { email = email });
else
ViewBag.Email = email;
return View();
}
|
配置电邮服务
将来您创建的几乎所有服务都具有某种配置,这些配置应该可以在代码外部进行配置。ASP。NET Core 3为此提供了一个内置的配置API。它提供了在应用程序运行时从多个源读取配置数据的各种功能。可以将键-值对分组为多层层次结构,用于配置数据持久性。此外,可以将配置数据自动反序列化为包含私有成员和属性的普通旧CLR对象(POCO)。
ANC3支持的配置源:
l
配置文件(JSON,XML,甚至为经典的INI文件)
l
环境变量EV
l
命令行参数CLA
l
内存中的.NET 对象MEM
l
加密的用户存储
l
Azure 关键库
l
自定义提供器
下面使用JSON配置文件配置邮件服务
步骤102.打开appsetting.json文件,添加电子右键相关配置信息
|
"Email": {
"MailType": "SMTP",
"MailServer": "smtp.163.com",
"MailPort": 25,
"UseSSL": true,
"UserId": "发送者的用户名@163.com",
"Password": "发送者的密码",
"RemoteServerAPI": "",
"RemoteServerKey": ""
}
|
步骤103.在项目根目录下创建Options文件夹添加EmailServiceOptions.cs
|
public class
EmailServiceOptions
{
public string MailType { get; set;
}
public string MailServer { get; set;
}
public string MailPort { get; set;
}
public string UseSSL { get; set;
}
public string UserId { get; set;
}
public string Password { get; set;
}
public string RemoteServerAPI { get; set;
}
public string RemoteServerKey { get; set;
}
public EmailServiceOptions()
{
}
public EmailServiceOptions(string mailType,
string mailServer, string mailPort, string useSSL,
string userId, string password, string
remoteServerAPI,
string remoteServerKey)
{
MailType = mailType;
MailServer = mailServer;
MailPort = mailPort;
UseSSL = useSSL;
UserId = userId;
Password = password;
RemoteServerAPI = remoteServerAPI;
RemoteServerKey = remoteServerKey;
}
}
|
步骤104.更新EmailService,添加模型注入构造函数

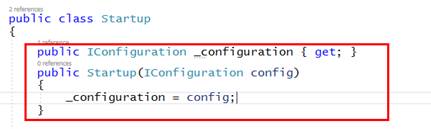
步骤105.给Startup添加配置属性并注入构造函数
步骤106.更新Startup.cs的服务配置

步骤107.细化EmailService中的SendEmail方法
|
public Task SendEmail(string emailTo, string subject, string message)
{
//完成邮寄功能
using (var
client = new
SmtpClient(_emailServiceOptions.MailServer, int.Parse(_emailServiceOptions.MailPort)))
{
if (bool.Parse(_emailServiceOptions.UseSSL)
== true)
{
client.EnableSsl = true;
}
if (!string.IsNullOrEmpty(_emailServiceOptions.UserId))
{
client.Credentials = new
NetworkCredential(_emailServiceOptions.UserId,
_emailServiceOptions.Password);
}
client.Send(new MailMessage("[发送者的电邮号]", emailTo, subject, message));
}
return Task.CompletedTask;
}
|
步骤108.测试SMTP服务

执行高级依赖性注入
ASP的另一个特性。帮助我们拥有可维护代码的是其固有的依赖注入(DI)功能。除其他优点外,DI确保类之间没有太多的耦合。在前一章中,您了解了DI如何工作,以及如何使用构造函数注入方法。但是,如果您需要在运行时注入许多实例,则此方法可能非常麻烦,并且会使理解和维护代码变得非常复杂。因此,您可以使用一种更高级的DI技术,称为方法注入。这允许您直接从代码中访问实例。
方法注入
在下面的示例中,您将添加一个用于处理游戏邀请和更新井字游戏应用程序的新服务。这有助于电子邮件通信,这是用来联系其他用户加入游戏,而使用的方法注入.
步骤109.在Services文件夹下创建GameInvitationService类,用来管理邀请的增删改等,
|
public class
GameInvitationService
{
private static ConcurrentBag<GameInvitationModel>
_gameInvitations;
public GameInvitationService()
{
_gameInvitations = new ConcurrentBag<GameInvitationModel>();
}
public Task<GameInvitationModel> Add(GameInvitationModel model)
{
model.Id = Guid.NewGuid();
_gameInvitations.Add(model);
return Task.FromResult(model);
}
public Task Update(GameInvitationModel model)
{
_gameInvitations = new
ConcurrentBag<GameInvitationModel>(_gameInvitations.Where(x => x.Id
!= model.Id)) { model };
return Task.CompletedTask;
}
public Task<GameInvitationModel> Get(Guid id)
{
return Task.FromResult(_gameInvitations.FirstOrDefault(x =>
x.Id == id));
}
}
|
步骤110.抽出接口,在单个文档内.
|
public interface IGameInvitationService
{
Task<GameInvitationModel> Add(GameInvitationModel model);
Task<GameInvitationModel> Get(Guid id);
Task
Update(GameInvitationModel model);
}
|
步骤111.把游戏邀请的接口和类注入到Startup.cs 的服务中
|
services.AddSingleton<IGameInvitationService,
GameInvitationService>();
|
步骤112.回到GameInvitation控制器中,定义[POST] Index方法
|
[HttpPost]
public IActionResult
Index(GameInvitationModel gameInvitationModel, [FromServices]IEmailService
emailService)
{
var gameInvitationService =
Request.HttpContext.RequestServices.GetService<IGameInvitationService>();
if (ModelState.IsValid)
{
emailService.SendEmail(gameInvitationModel.EmailTo,
_stringLocalizer["Invitation for playing a
Tic-Tac-Toe game"],
_stringLocalizer[$"Hello, you have been
invited to play the Tic - Tac - Toe game by { 0}. For joining the game,please click here { 1} ", gameInvitationModel.InvitedBy,
Url.Action("GameInvitationConfirmation",
"GameInvitation", new
{
gameInvitationModel.InvitedBy,
gameInvitationModel.EmailTo
}, Request.Scheme,
Request.Host.ToString())]);
var invitation =
gameInvitationService.Add(gameInvitationModel).Result;
return RedirectToAction("GameInvitationConfirmation",
new { id = invitation.Id });
}
return View(gameInvitationModel);
}
|
步骤113.创建GameInvitationConfirmation方法
|
[HttpGet]
public IActionResult
GameInvitationConfirmation(Guid id,
[FromServices]IGameInvitationService gameInvitationService)
{
var gameInvitation = gameInvitationService.Get(id).Result;
return View(gameInvitation);
}
|
步骤114.在前端方面创建GameInvitationConfirmation视图.
|
@model
TicTacToe.Models.GameInvitationModel
@{
ViewData["Title"] = "GameInvitationConfirmation";
}
<h1>
@Localizer["You
have invited {0} to play a Tic-Tac-Toe game with you, please wait until the
user is connected",
Model.EmailTo]
</h1>
@section Scripts{
<script>
$(document).ready(function () {
GameInvitationConfirmation('@Model.Id');
});
</script>
}
|
步骤115.在scripts1.js中添加GameInvitationConfirmation函数
|
function
GameInvitationConfirmation(id) {
if (window.WebSocket) {
alert("Websockets are enabled");
openSocket(id, "GameInvitation");
}
else {
alert("Websockets are not enabled");
interval = setInterval(() => {
CheckGameInvitationConfirmationStatus(id);
}, 5000);
}
}
|
步骤116.在scripts2.js中创建一个CheckGameInvitationConfirmationStatus的方法
|
function
CheckGameInvitationConfirmationStatus(id) {
$.get("/GameInvitationConfirmation?id="
+ id,
function (data) {
if (data.result === "OK")
{
if (interval !== null)
clearInterval(interval);
window.location.href = "/GameSession/Index/"
+ id;
}
});
}
|
步骤117.scripts2.js中的openSocket方法.
|
var openSocket = function (parameter, strAction) {
if (interval !== null)
clearInterval(interval);
var protocol = location.protocol === "https:" ? "wss:"
: "ws:";
var operation = "";
var wsUri = "";
if (strAction == "Email")
{
wsUri = protocol + "//" +
window.location.host + "/CheckEmailConfirmationStatus";
operation = "CheckEmailConfirmationStatus";
}
else if (strAction
== "GameInvitation") {
wsUri = protocol + "//" +
window.location.host + "/GameInvitationConfirmation";
operation = "CheckGameInvitationConfirmationStatus";
}
var socket = new
WebSocket(wsUri);
socket.onmessage = function (response) {
console.log(response);
if (strAction == "Email"
&& response.data == "OK")
{
window.location.href = "/GameInvitation?email="
+ parameter;
} else if
(strAction == "GameInvitation")
{
var data = $.parseJSON(response.data);
if (data.Result == "OK")
window.location.href = "/GameSession/Index/"
+ data.Id;
}
};
socket.onopen = function () {
var json = JSON.stringify({
"Operation": operation,
"Parameters": parameter
});
socket.send(json);
};
socket.onclose = function (event) {
};
};
|
步骤118.在通讯中间件中添加一个ProcessGameInvitationConfirmation方法.
|
private async
Task ProcessGameInvitationConfirmation(HttpContext
context)
{
var id = context.Request.Query["id"];
if (string.IsNullOrEmpty(id))
await context.Response.WriteAsync("BadRequest:Id is required");
var gameInvitationService =
context.RequestServices.GetService<IGameInvitationService>();
var gameInvitationModel =
await
gameInvitationService.Get(Guid.Parse(id));
if (gameInvitationModel.IsConfirmed)
await context.Response.WriteAsync(
JsonConvert.SerializeObject(new
{
Result = "OK",
Email = gameInvitationModel.InvitedBy,
gameInvitationModel.EmailTo
}));
else
{
await context.Response.WriteAsync(
"WaitGameInvitationConfirmation");
}
}
|
步骤119.再添加ProcessGameInvitationConfirmation方法
|
private async
Task
ProcessGameInvitationConfirmation(HttpContext context,
WebSocket webSocket, CancellationToken ct, string
parameters)
{
var gameInvitationService =
context.RequestServices.GetService<IGameInvitationService>();
var id = Guid.Parse(parameters);
var gameInvitationModel = await gameInvitationService.Get(id);
while (!ct.IsCancellationRequested &&
!webSocket.CloseStatus.HasValue &&
gameInvitationModel?.IsConfirmed == false)
{
await SendStringAsync(webSocket,
JsonConvert.SerializeObject(new
{
Result = "OK",
Email = gameInvitationModel.InvitedBy,
gameInvitationModel.EmailTo,
gameInvitationModel.Id
}), ct);
Task.Delay(500).Wait();
gameInvitationModel = await
gameInvitationService.Get(id);
}
}
|
步骤120.更新通讯中间件的Invoke方法.,
|
public async
Task Invoke(HttpContext context)
{
if (context.WebSockets.IsWebSocketRequest)
{
var webSocket = await
context.WebSockets.AcceptWebSocketAsync();
var ct = context.RequestAborted;
var json = await
ReceiveStringAsync(webSocket, ct);
var command =
JsonConvert.DeserializeObject<dynamic>(json);
switch (command.Operation.ToString())
{
case "CheckEmailConfirmationStatus":
{
await ProcessEmailConfirmation(context,
webSocket, ct, command.Parameters.ToString());
break;
}
case "CheckGameInvitationConfirmationStatus":
{
await
ProcessGameInvitationConfirmation(context, webSocket, ct,
command.Parameters.ToString());
break;
}
}
}
else if
(context.Request.Path.Equals("/CheckEmailConfirmationStatus"))
{
await ProcessEmailConfirmation(context);
}
else if
(context.Request.Path.Equals("/CheckGameInvitationConfirmationStatus"))
{
await
ProcessGameInvitationConfirmation(context);
}
else
{
await _next?.Invoke(context);
}
}
|